 NexGPU-算力租赁,GPU服务器,GPU云算力,AI服务器租用-新闻博客
When your ComfyUI workflow starts chaining FLUX full-precision large models, multi-layer ControlNet, IP-Adapter, or long-sequence video generation nodes like Wan 2.2 and MiniMax H3, local GPUs with 8GB to 12GB VRAM will almost inevitably throw CUDA out of memory errors.
To bypass hardware limitations, many creators and studios turn to the cloud. But in the process of actually migrating to "ComfyUI cloud GPU," people often find themselves falling into another dilemma:
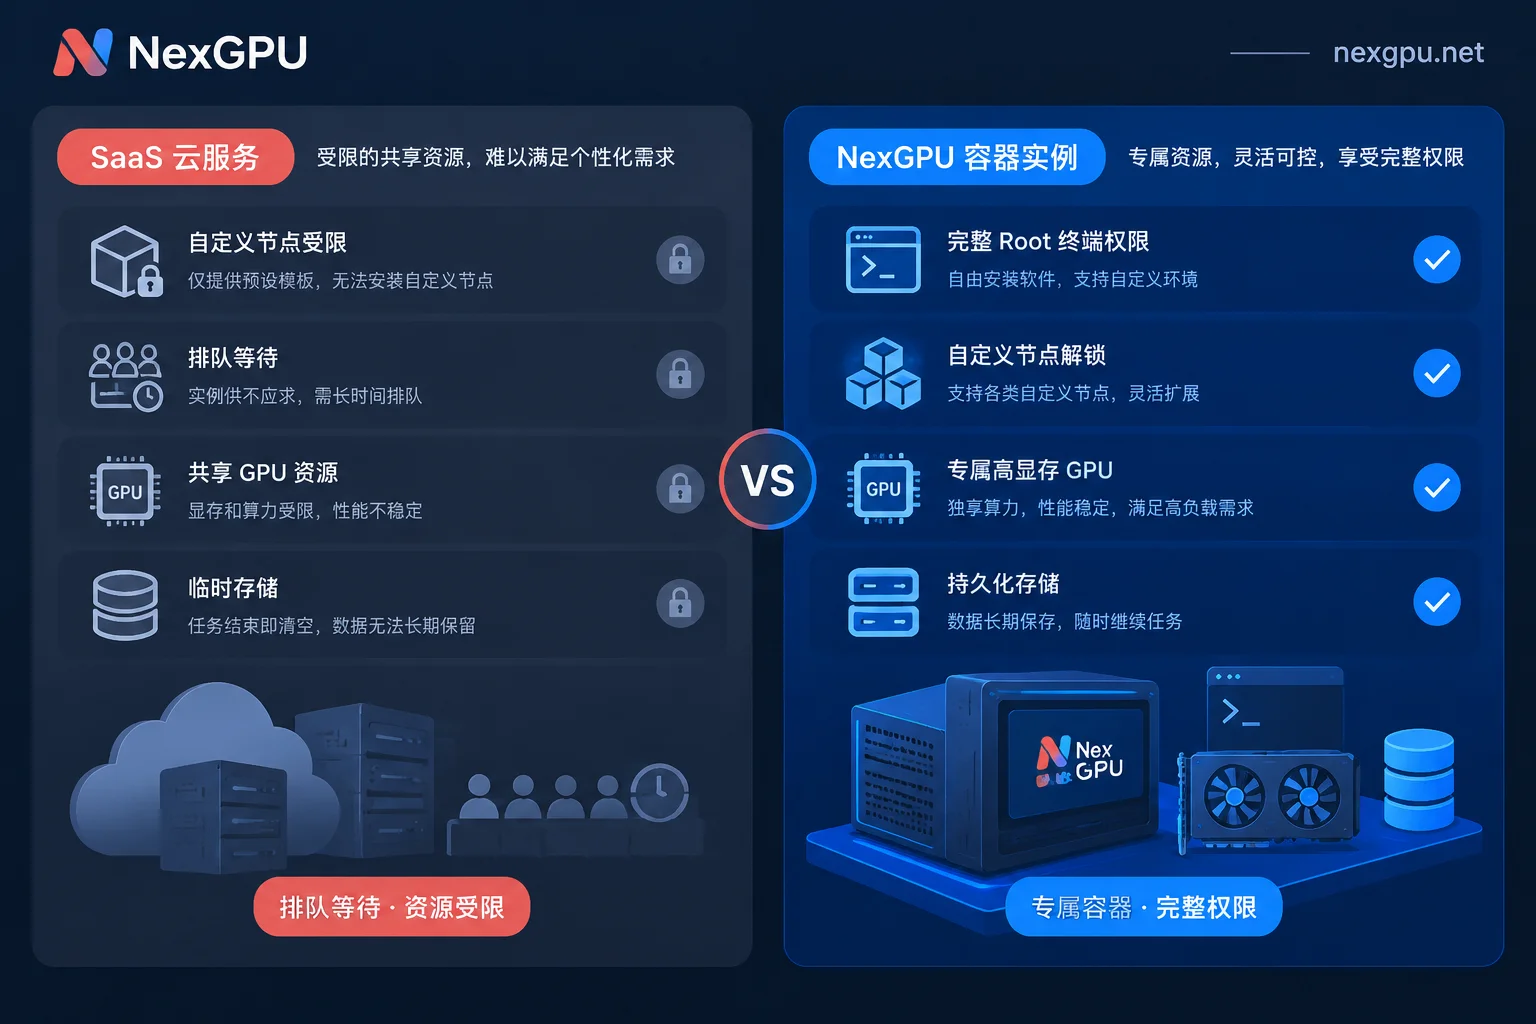
- Using closed SaaS online platforms: Although you can use them right in the browser, they often run a fixed set of nodes maintained by the platform. Once a new workflow imported from the community contains third-party Custom Nodes that are not built-in, the canvas will be filled with red errors and you cannot troubleshoot via command line yourself; at the same time, you often face issues like single-workflow queuing, inability to run multiple concurrent workflows, and high-frequency credit consumption.
- Using traditional bare-metal cloud servers: Although they give you full system permissions, every time you boot you have to configure drivers from scratch, align CUDA and PyTorch versions, and even re-download tens or hundreds of GB of Checkpoints, VAE, and LoRA each time you reopen an instance. A large amount of compute fees are burned on waiting for download progress bars.
To truly turn cloud GPUs into handy productivity tools, the core principle is actually just one: Compute should be used and stopped on demand, but your custom nodes, model assets, and workflow states must be fully autonomous and persistently retained.
If you have already read How to Choose a GPU for AI Video Generation: From ComfyUI Quantized Gacha, Full-Precision Output to LoRA Training or evaluated Is L40S Enough for Stable Diffusion? A Separate Look at SD 1.5, SDXL, Flux, and LoRA Training, and clarified the VRAM tier required by your workflow, then the most critical next step is how to build a ComfyUI dedicated workstation in the cloud that is "zero environment hassle, plugin freedom, and no compute cost when not generating images." Below we use NexGPU's practical workflow as an example to break down the complete loop from boot planning to daily money-saving operations.
1. SaaS-hosted Workflows vs. Exclusive Container Instances: Which Cloud Solution Do You Actually Need?
Before deciding how to deploy, first understand the boundaries of different cloud forms. The core appeal of ComfyUI lies in the custom nodes (Custom Nodes) and underlying acceleration libraries (such as various Attention optimization and compilation acceleration plugins) that the community updates every day.
- Restricted online web version: Suitable for light experience with only fixed standard templates and no new plugins.
- Exclusive container ComfyUI cloud GPU (NexGPU mode): Each instance is an exclusive container environment, providing a complete browser root terminal and direct SSH access. You can use
ComfyUI-Managerto install any obscure node just like on your local computer, or directly enter the terminal and executepip installto resolve dependency conflicts; meanwhile, the platform does not read or touch your disk contents. Unpublished commercial LoRA, proprietary workflow blueprints, and produced commercial materials all remain in your own independent environment.
2. A Key Step Before Boot: Choose Image and Disk First to Avoid Later "Expansion Deadlock"
Many first-time GPU renters are used to clicking whichever card is cheapest, only to find out after entering that the environment is wrong or the disk is stuffed with models. On NexGPU, a safer order is "choose environment and calculate capacity first, then filter machines."
1. Choose a Preset Image or Your Own Docker Image
Go to NexGPU Image Templates, and under the "Image and Video" category you can directly check the ComfyUI preset template. This template has already pre-installed the underlying graphics driver, CUDA, PyTorch, and ComfyUI core dependencies. You can start the service directly after boot, supporting SDXL, FLUX, and mainstream video diffusion models.
If you are a R&D team with an environment that already encapsulates a specific CUDA version, compiles acceleration operators, or solidifies internal nodes, the official website also supports directly filling in your own Docker image (public or private repositories), and customizing startup commands and environment variables.
2. Choose Environment Before Filtering Cards, Automatically Filtering Nodes with Insufficient VRAM
After selecting a template, go to the GPU Compute Market. Choosing the environment before filtering machines has a very practical protection mechanism: machines with insufficient VRAM to run the environment will be directly marked by the system with the reason, preventing beginners from mistakenly renting small-VRAM machines and causing out-of-memory errors right after boot.
You can filter by VRAM, price, region, and bandwidth in the market according to the VRAM recommendations in the Model Selection Guide or the AI Image and Video Scenario Practices Page:
- Daily complex text-to-image, FLUX workflows, and light video gacha: Focus on high-cost-effective large-VRAM cards in the consumer list such as RTX 3090, RTX 4090, RTX 5090.
- High-resolution long video full-precision generation, batch concurrent workflows: You can switch to the data center list and choose A100, H100, H200, or even B200 as needed.
3. Be Sure to Leave Enough Disk Space at Creation and Pay Attention to Bandwidth
One of the most common engineering pitfalls for ComfyUI users is insufficient disk space estimation. A full-precision large model is often 10GB~20GB, plus various ControlNet, CLIP, T5 text encoders, VAE, and temporarily generated video sequence frames, tens of GB will quickly run out.
Note that NexGPU instances do not support dynamic disk expansion after creation, nor do they support adding/removing port mappings or separately modifying bandwidth after creation. Therefore, at the step of placing an order and booting, please directly set the disk capacity to a sufficient tier once and for all based on the total volume of models you plan to store; also, because you often need to pull tens of GB of weight files from Hugging Face or Civitai, it is recommended to prioritize nodes with higher network bandwidth when filtering machines, and pay attention to the compute unit price and disk unit price listed separately for each machine, so you know what to expect.
3. Environment Connection and Efficient Management of 100GB Model Assets
After the instance enters the running state, each machine will be assigned an independent public IP, port mapping, and a set of reserved ports for services you start yourself. For details on connection and file management, please refer to the Instance Connection Documentation. For ComfyUI scenarios, the following combination is recommended:
1. Three Connection Methods for Troubleshooting
When you click Queue Prompt on the ComfyUI web page to prepare for image generation, or restart after installing new nodes, don't just stare at the front-end canvas. You can always open the web terminal (root terminal) in the browser, or use a local terminal to connect to the instance via direct SSH (public IP plus port, no jump server), to view real-time backend console download progress, Python error stacks, and sampling step time; if the image environment includes Jupyter, you can also open it with one click with a token.
2. One-Click Install aaPanel to Manage Models and Outputs Like a Network Drive
Using mv, cp in the command line to organize the intricate models/checkpoints, models/loras, models/controlnet directories is cumbersome and error-prone for many creators.
In NexGPU's instance management, you can one-click install a visual management panel (aaPanel) (which will occupy part of the instance disk). After installation, open the panel directly in the browser:
- Upload small files: Locally tuned workflow
.jsonblueprints, tens of MB LoRA weights, reference image materials, directly drag and drop to upload to the corresponding directory. - Download large models: Use multi-threaded tools in the terminal or panel scheduled tasks to pull large models directly to the corresponding directory in the cloud, eliminating the double traffic and time consumption of "first download to local computer, then upload to cloud."
- Package and download finished products: After a day of gacha, browse the
outputfolder directly in the panel, package and compress satisfactory final cuts and download them back locally, and clean up discarded intermediate test images to free up disk space.
4. Calculate Three Accounts: Use "Stop and Save Disk" to Make Workflows Available on Demand and Gone When Done
How to avoid "forgetting to shut down and burning hundreds of bucks overnight" while not having to reconfigure the environment every time you boot? This is where the platform's billing split and lifecycle management mechanisms come in (see Billing Documentation and Instance Management Documentation for details).
If you are interested in long-term maintenance of underlying development environments, you can also read another practical guide on this site: How to Set Up a Daily Development Environment on a GPU Cloud Server: A Practical Guide from Image Selection, Direct SSH to Stop-and-Save-Disk. In ComfyUI scenarios, the specific money-saving logic is as follows:
1. Transparent Separation of Compute, Storage, and Traffic
NexGPU bills have no activation fee, port fee, or image license fee, no minimum spend or minimum rental duration, and the unit price at order time is locked until the instance is destroyed. The instance details page only lists three charges separately:
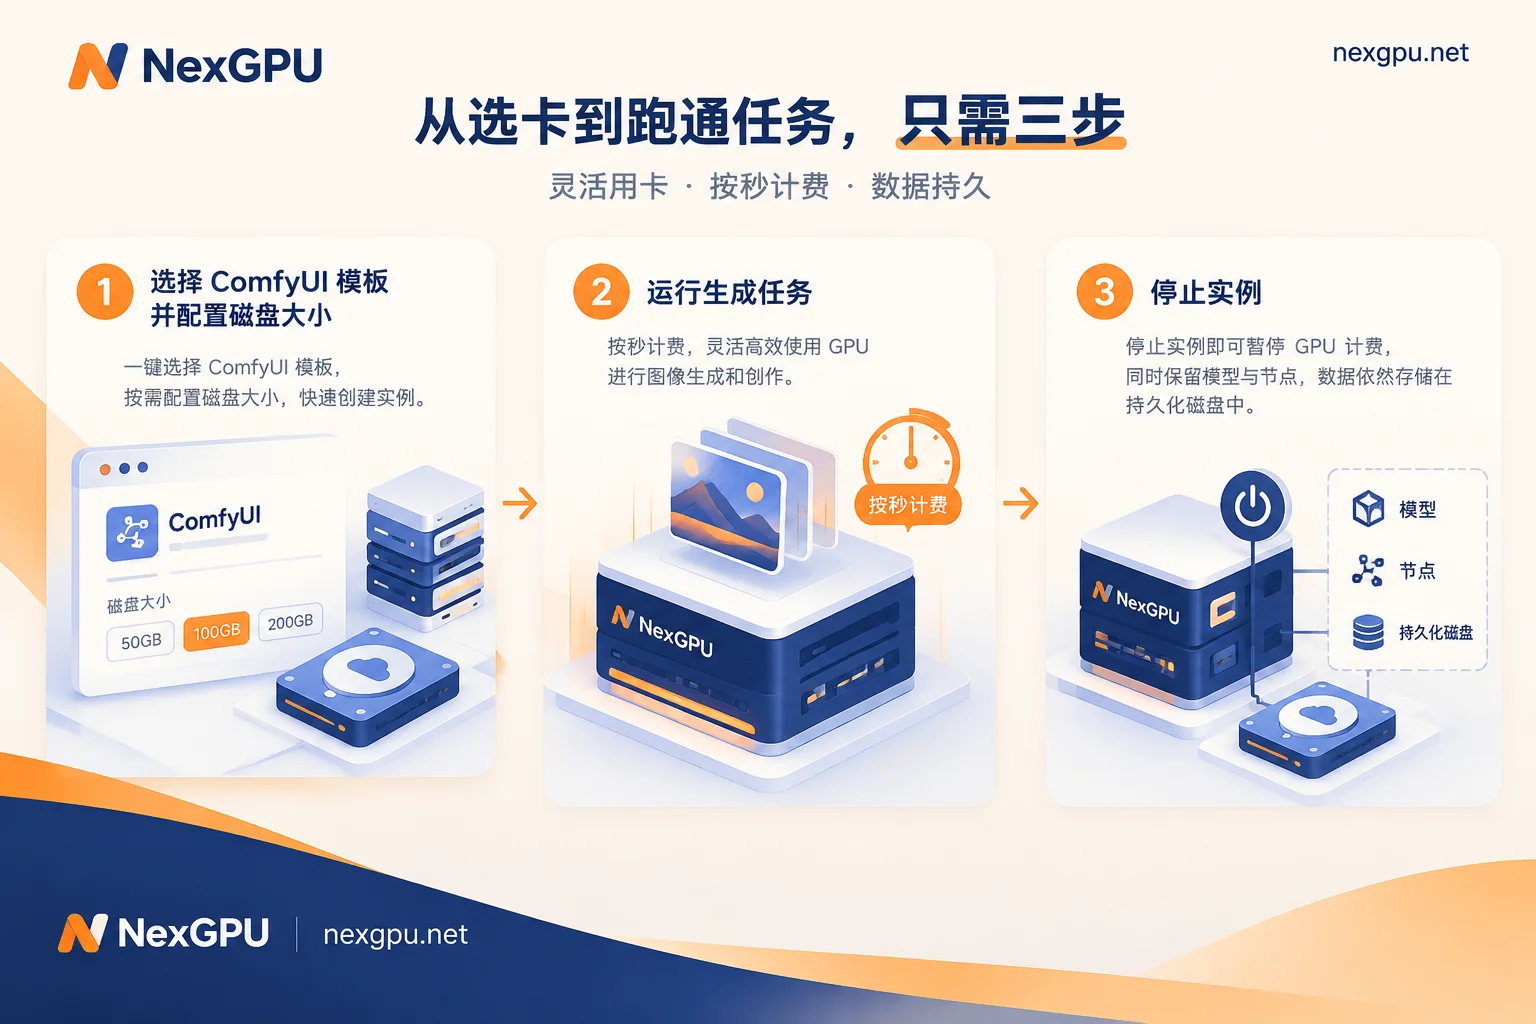
- Compute fee: Metered by second, priced by hour. Only charged when the instance is "running", billing stops immediately once stopped or destroyed.
- Storage fee: Billed per GB/month, starting from instance creation (including during image pulling), charged as usual after stopping, and stops only when the instance is destroyed.
- Traffic fee: Billed by actual GB generated.
2. Daily Iteration: "Stop and Save Disk" After Work, Resume in Seconds at Work
When you have tuned a complex workflow containing a dozen custom nodes today and downloaded 80GB of model weights, do not click destroy when finishing creation, but directly click "Stop".
After stopping, the expensive GPU compute fee immediately drops to zero, and the instance's disk, installed Python dependencies, model files, and generation records are all retained intact, with only a very low monthly prorated storage fee incurred during the period. When inspiration comes the next day, click start, no need to re-download any models, open the browser and continue running images on yesterday's canvas.
3. Project Completion: Back Up Core Assets and "Destroy" to Zero Out
Note that the platform does not provide automatic data backup. Once an instance is "destroyed" (requires entering the instance number for secondary confirmation), the disk is immediately released and data cannot be recovered.
Therefore, when a short-term project is completely closed or the model environment will not be needed for the next few weeks, the standard action is: first export and save the carefully polished workflow as a .json file via the web page, download the trained private LoRA and final cuts back locally, and then execute the destroy operation in the console to completely cut off storage fees.
In addition, the platform uses a prepaid mechanism and will send a warning email when the account balance is low; if the balance is exhausted while running long video batch processing, the system will also automatically stop (not destroy) first, leaving you a buffer window to recharge and recover (supporting Alipay and USDT-TRC20 recharge). Only when the negative balance exceeds a set duration will automatic destruction be triggered, protecting your work results to the greatest extent.
5. Advanced Play: Multi-Instance Parallel Gacha and Studio Collaboration
For independent creators, a single-GPU instance is enough for daily needs; but for AI visual studios or R&D teams taking commercial orders, time is often more expensive than the price difference of a single card.
Since NexGPU allows registration with an email (no cumbersome real-name authentication and quota approval), and the number of simultaneously open instances is unlimited (only constrained by account balance), when you encounter an urgent commercial order and need to test different seeds, different prompt matrices, or different sampler parameters, you can completely start multiple consumer-grade GPU instances at the same time, distribute different generation queues for parallel output, trade space for time, and stop immediately after running.
If the team enters the stage of large-scale production, needs to do high-VRAM multi-GPU fine-tuning, or encapsulate ComfyUI as a backend API into the business pipeline, you can also directly filter multi-GPU nodes in the market by minimum card count, or contact sales to customize enterprise-level solutions including private networks, data isolation, reserved instances, and corporate payment invoicing.
No need to compromise on image quality due to the VRAM red line of local GPUs, and no need to be tied down by the node whitelist of closed platforms. Now you can directly check the Quick Start Guide, go to NexGPU Image Templates to select ComfyUI, and use a cloud workstation with large VRAM that truly belongs to you to turn complex node blueprints in your mind into reality.