 NexGPU-算力租赁,GPU服务器,GPU云算力,AI服务器租用-新闻博客
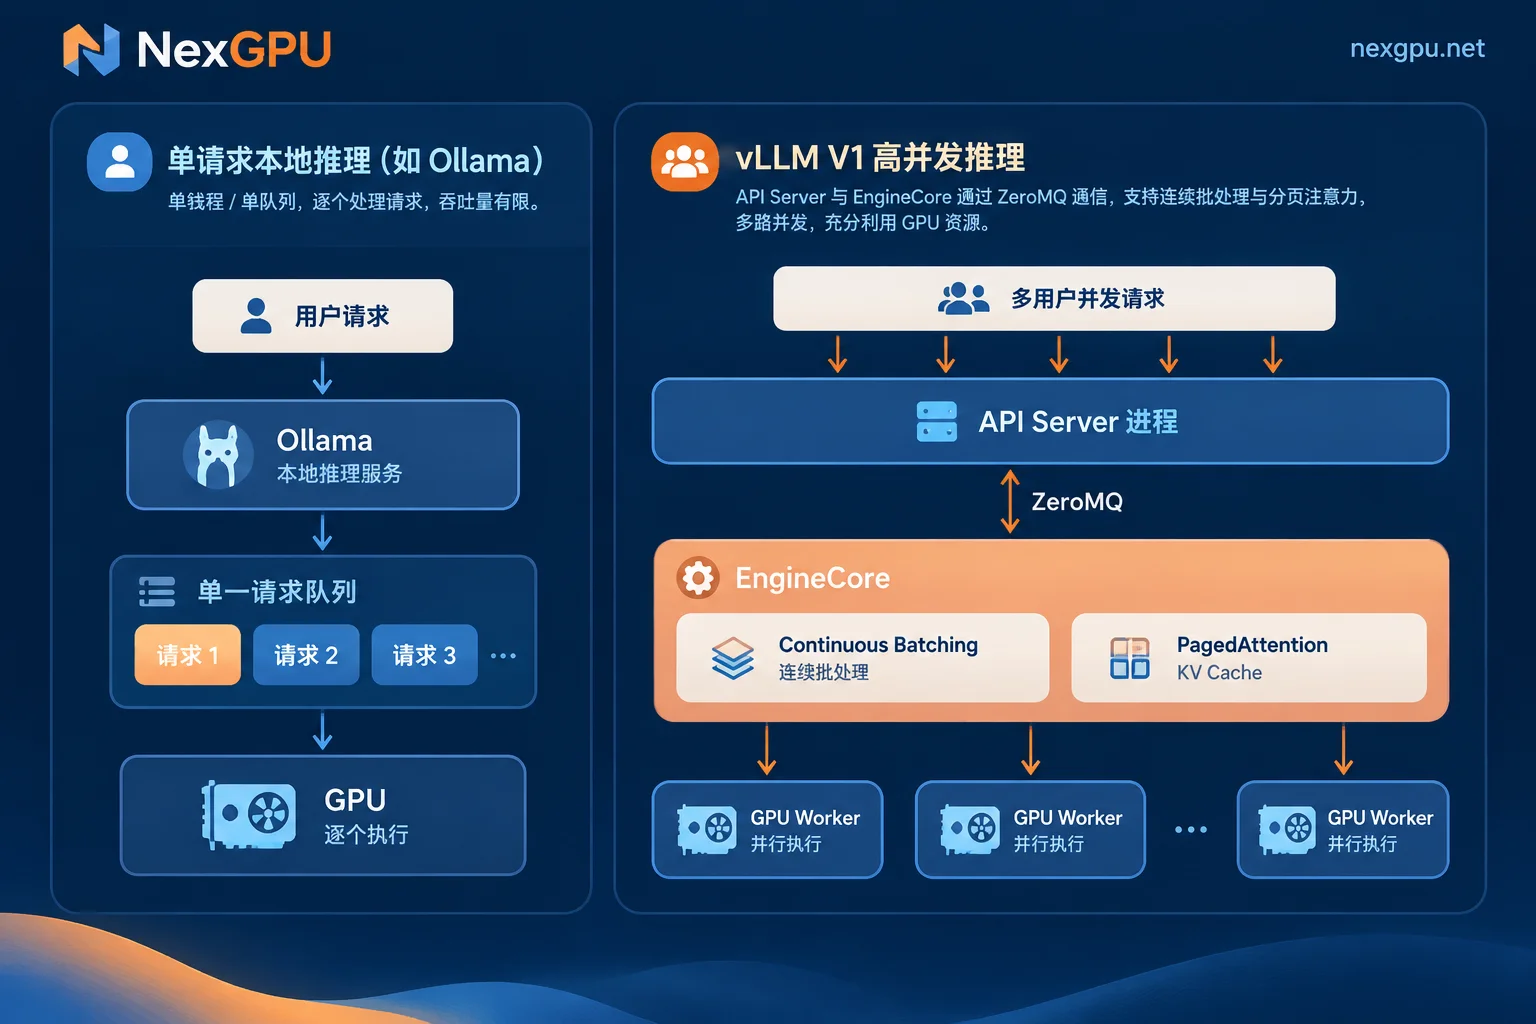
When developing large model applications locally or validating prototypes, many developers are used to running models with a single ollama run command. However, when the business enters joint debugging, internal knowledge base launch, or integration with AI Agent workflows, single-concurrency or low-concurrency tools quickly hit throughput bottlenecks—multiple requests come in simultaneously, queue times skyrocket, and even out-of-memory (OOM) errors occur.
From "can run on a personal machine" to "team high-concurrency availability," vLLM deployment is almost an unavoidable step for all engineering teams. Focusing on inference engine selection, V1 architecture features, VRAM and GPU selection, as well as cloud environment configuration and port exposure, we below fully break down a practical vLLM production-grade deployment solution.
1. Why is everyone switching to vLLM when moving from prototype to production?
In the open-source inference ecosystem, Ollama, vLLM, SGLang, and TGI (Text Generation Inference) are the four most commonly compared tools. They have no absolute pros and cons, but very clear scenario boundaries:
| Inference Framework | Core Positioning and Advantages | Applicable Scenarios | Limitations |
|---|---|---|---|
| Ollama | Minimalist command-line experience, out-of-the-box, suitable for single-user interaction | Local development testing, personal assistants, small-scale single-machine experiments | Limited throughput scalability under high concurrency, fewer production-level scheduling parameters |
| vLLM | Based on PagedAttention and Continuous Batching, high throughput, broadest ecosystem support | Enterprise API services, high-concurrency online inference, batch offline processing | Strongly dependent on GPU environment, CUDA and driver versions must match strictly |
| SGLang | Deep caching and compilation optimization for complex prompts and structured output (JSON, etc.) | Multi-turn Agent orchestration, high-frequency fixed prefix calls, complex control flow | Slightly slower adaptation for some niche model architectures than vLLM |
| TGI | Official Hugging Face product, tightly integrated with HF ecosystem | Early standard deployment solution for HF models | Community activity and new feature iterations gradually diverted to vLLM and SGLang |
Practical changes brought by vLLM V1 architecture
As vLLM evolved to the V1 core architecture, its engineering advantages further amplified:
- Multi-process decoupling (API Server and EngineCore separation): HTTP request parsing, tokenization, and multimodal data loading are completed in independent processes, communicating with the underlying GPU execution engine via ZeroMQ. This bypasses the Python GIL lock limitation, avoiding CPU preprocessing slowing down GPU inference under high-concurrency requests.
- Zero-overhead Prefix Caching: In RAG (Retrieval-Augmented Generation) or Agent scenarios with long System Prompts, many requests share the same prefix. vLLM can automatically reuse this KV Cache, significantly reducing Time to First Token (TTFT).
- Chunked Prefill: Splits very long context inputs into small chunks and interleaves them with the Decode phase, preventing a single long-text request from blocking the streaming output of the entire batch.
2. Hardware considerations before vLLM deployment: how to calculate VRAM and choose GPUs?
Before starting vLLM, the most common pitfall is calculating VRAM only based on model parameter count while ignoring KV Cache reserved space.
When vLLM starts, it pre-allocates physical blocks by default according to --gpu-memory-utilization (default value 0.9, i.e., occupying 90% of VRAM). Your GPU VRAM must simultaneously hold three things:
- Model weights: e.g., 7B/8B models under FP16/BF16 occupy about 15~16GB; 70B/72B models under FP16 require about 140GB+, and after AWQ/GPTQ INT4 quantization about 38~42GB.
- KV Cache pool: determines how many concurrent requests (Batch Size) you can handle simultaneously and the supported context length (
--max-model-len). (If you encounter long-text VRAM overflow, you can refer to our previous What to do when long-context inference runs out of VRAM? Calculate KV Cache first, then adjust from low to high cost). - CUDA context and activation overhead: usually requires a safety margin of 2~4GB.
GPU selection approach for common model scales
If you are unsure how much VRAM an open-source model actually consumes after quantization, you can directly check NexGPU's model selection guide (for example, in the Qwen model page, we have marked the VRAM thresholds and recommended GPU types for different parameter versions):
- 7B ~ 14B level (daily conversation, lightweight Agent):
Full precision (BF16/FP16) or 14B quantized version can easily run on a single consumer-grade GPU with 24GB~32GB VRAM (such as RTX 3090, RTX 4090, RTX 5090), with extremely high cost-effectiveness. 32B ~ 72B level (enterprise knowledge base, complex code generation):
- If using INT4/FP8 quantization, a single 48GB VRAM card or a single A100/H100 (80GB) can balance weights and considerable concurrent context.
- If requiring BF16 full precision for 72B models, a single card cannot fit, and multi-card Tensor Parallelism must be used (i.e., setting
--tensor-parallel-size 2or4). In this case, it is recommended to filter 2-card or 4-card node whole machines by "minimum number of cards" in the GPU market. (For communication bottlenecks and configuration details of multi-card parallelism, you can read further What is the appropriate inference parallelism? First take the minimum TP based on VRAM, then consider interconnect and business goals).
- Ultra-large parameter MoE models (e.g., DeepSeek-R1/V3 full version, etc.):
Require H100, H200, or B200 multi-card high-VRAM nodes, or even cross-node RDMA interconnect.
When selecting machines on NexGPU, you can first select the model environment and then filter machines—machines with insufficient VRAM will be directly marked in the list with reasons, saving you from manual guessing; you can also combine with the GPU selection documentation to finely filter by bandwidth, region, and unit price.
3. Why does local vLLM environment setup always fail? Break through with prebuilt images and custom Docker
Many developers, when executing pip install vllm on a bare metal for the first time, often fall into a long environment quagmire: vLLM's precompiled Wheel packages are strictly bound to the underlying CUDA version (e.g., CUDA 12.x) and PyTorch version. Once the host's NVIDIA driver version is low, or the nvcc toolchain does not match, various C++ symbol not found or FlashAttention compilation failure errors occur.
For vLLM deployment in the cloud, there is no need to spend precious per-second billed compute on compiling the environment. Depending on your project stage, there are two out-of-the-box approaches on NexGPU:
Path A: Directly use the prebuilt "vLLM image template" (recommended for quick launch)
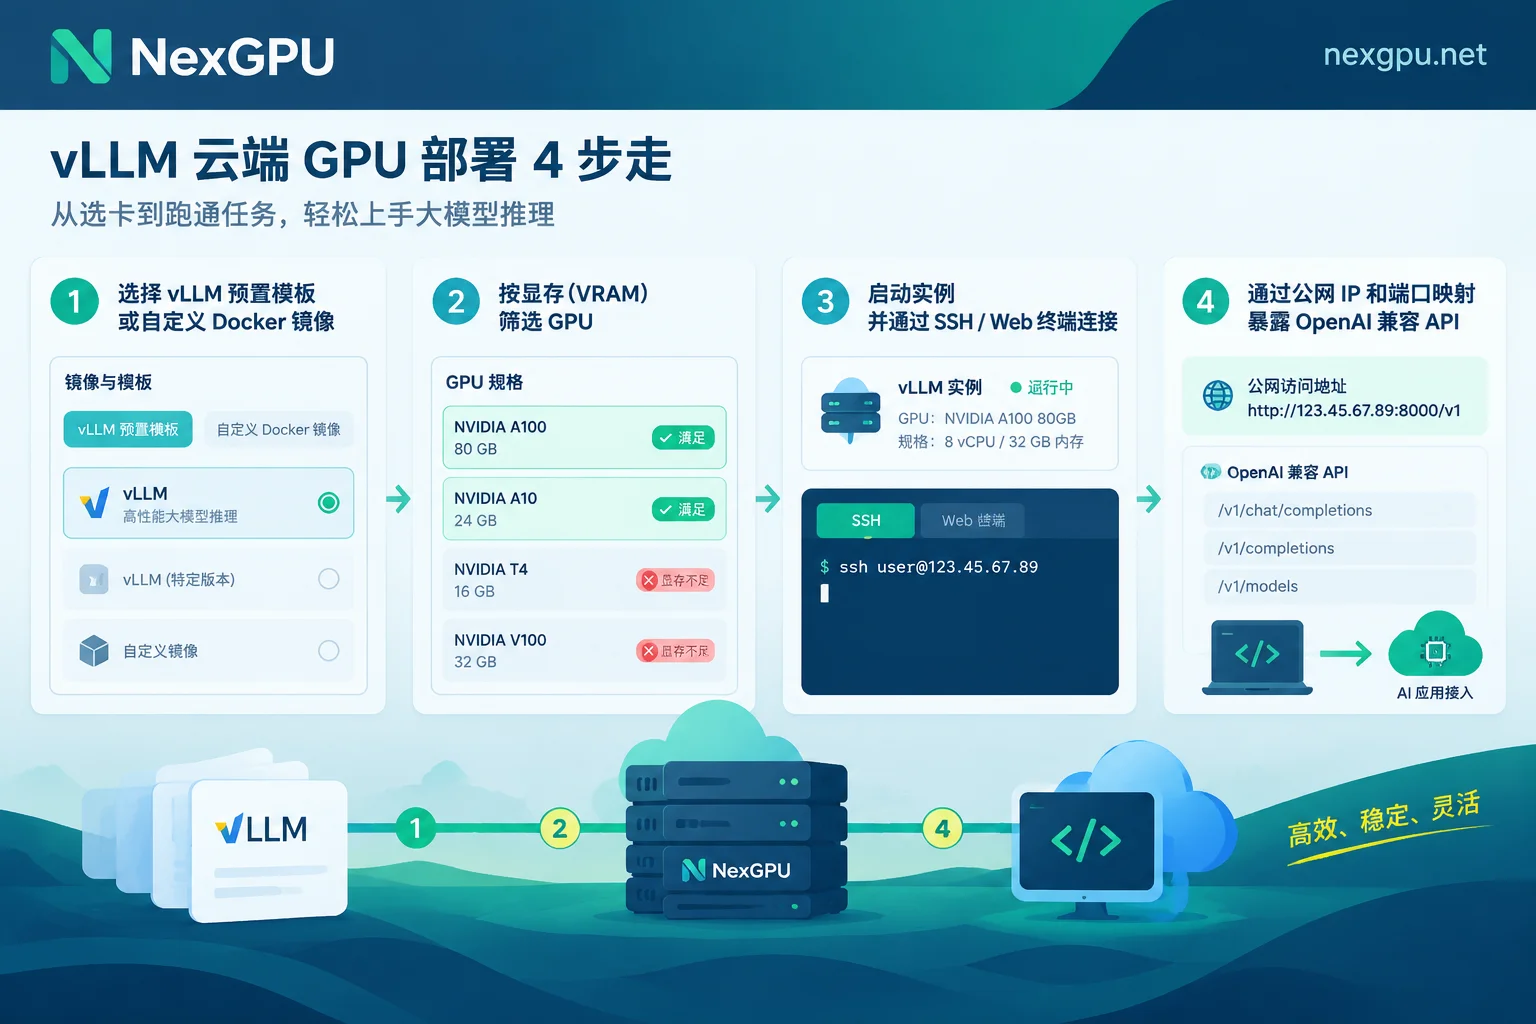
In NexGPU's image templates, the platform has pre-installed and integrated drivers, CUDA, frameworks, and dependencies. You only need to check vLLM under the "Large Model Inference" category (the same category also provides TGI, Ollama, SGLang for comparative testing), and after booting, it directly provides a standard OpenAI-compatible API.
Path B: Fill in a custom Docker image (suitable for version locking and production delivery)
If your business code or specific model architecture locks a particular CUDA version or a specific commit of vLLM (for example, when the official recommendation is to lock a specific CUDA version), you can directly fill in your own Docker image address (supports public or private repositories) when creating an instance, and customize the container's entrypoint and environment variables (such as HF_TOKEN, VLLM_USE_V1=1, etc.).
4. Four practical steps: Launch vLLM on a GPU cloud server and integrate into business
Below, taking deploying an open-source large model service supporting the OpenAI API protocol on NexGPU as an example, we sort out the complete closed loop from boot to joint debugging (for more scenario budgets and configuration combinations, you can also directly refer to the large model private deployment scenario page):
Step 1: GPU and disk planning
- Register an account with email (no real-name verification or quota application required; after registration, you can view real-time prices).
- On the instance creation page, select the vLLM image template and filter suitable GPU machines.
- Note disk capacity: Online disk expansion is not supported after instance creation. Therefore, before ordering, be sure to leave enough storage space based on model weight size (e.g., 32B full precision model weights are about 65GB; adding system and cache, it is recommended to allocate 120GB~150GB or more disk). Compute unit price and disk unit price are listed separately in the list, clear at a glance.
Step 2: Connect to instance and pull model weights
After the instance is running, you have three ways to take over the environment (see connection guide for details):
- Web terminal: Open a root terminal directly in the browser, suitable for quickly executing a few commands.
- SSH direct connection: Each instance comes with an independent public IP and port, without going through a jump server. After configuring the default public key, you can connect directly with local VS Code or terminal (for daily development configuration tips, see How to set up a daily development environment on a GPU cloud server: from image selection, SSH direct connection to stop-and-keep-disk practical guide).
- Visual panel: If you are not used to pure command-line management of weight files and daemons, you can install aaPanel with one click in the console to visually manage files, processes, and scheduled tasks in the browser (note that aaPanel will occupy some disk space).
Step 3: Start the vLLM OpenAI-compatible server
If using a prebuilt image, the service is usually automatically started as configured by the template. If you need to manually tune parameters to start, you can run the standard vllm serve command in the terminal:
vllm serve Qwen/Qwen2.5-32B-Instruct-AWQ \
  --quantization awq \
  --tensor-parallel-size 1 \
  --max-model-len 16384 \
  --gpu-memory-utilization 0.90 \
  --host 0.0.0.0 \
  --port 8000 \
  --api-key your-custom-secret-key
Key parameter troubleshooting tips:
--max-model-len: Many open-source models default to a context of up to 32K or 128K; starting directly with the default value will cause single-card KV Cache pre-check failure errors. Limiting it to8192or16384according to actual business needs can significantly improve concurrent throughput.--tensor-parallel-size: Set to the number of GPU cards you rent (e.g., single card is1, dual-card whole machine is2).
Step 4: Port mapping and external client calls
Each NexGPU instance comes with a public IP and default port mapping, and additionally reserves a set of backup ports for users' own services (note: port mappings cannot be added or removed after instance creation; just bind your vLLM --port to the system-assigned backup internal port).
After the service starts, in your business backend, LangChain, Dify, or Cursor, simply point the Base URL to the instance's public IP and mapped port, and you can seamlessly call with the standard OpenAI SDK:
from openai import OpenAI

client = OpenAI(
    api_key="your-custom-secret-key",
    base_url="http://<实例公网IP>:<映射外部端口>/v1"
)

response = client.chat.completions.create(
    model="Qwen/Qwen2.5-32B-Instruct-AWQ",
    messages=[
        {"role": "system", "content": "你是一个严谨的企业级技术助手。"},
        {"role": "user", "content": "请简述 vLLM PagedAttention 的核心作用。"}
    ],
    temperature=0.7,
    stream=True
)

for chunk in response:
    if chunk.choices[0].delta.content:
        print(chunk.choices[0].delta.content, end="", flush=True)
5. Inference cost control and operational pitfalls: per-second billing + stop-and-keep-disk
As we mentioned in AI computing power rental enters the "inference over half" era: how small and medium teams and developers can rent cards on demand and calculate costs precisely, inference workloads often come with obvious peaks and valleys or phased validation characteristics. Managing vLLM instances on NexGPU (see instance management documentation and billing description for details), mastering the following rules can help you spend every bit of budget wisely:
- Understand the three transparent bills:
The bill only has three items: compute, storage, and traffic, listed in real-time on the instance details page. There are no activation fees, port fees, or minimum rental duration restrictions. Moreover, the unit price at the time of order is locked until the instance is destroyed, unaffected by subsequent market price fluctuations. - Make good use of "stop and keep disk" to avoid re-pulling weights:
For internal testing, stress testing, joint debugging, or non-7×24 batch inference, simply click Stop in the console after work or after completing tasks. After stopping, compute fees stop billing immediately (compute fees are measured per second and billed per hour), only a low storage fee calculated per GB/month is retained. Next time you start, the tens of GB of model weights and tuned vLLM startup scripts are all there, no need to re-download. - Pay attention to destruction and data security boundaries:
NexGPU instances are exclusive containers; the platform does not read or back up disk contents. When you confirm that an environment is no longer needed and enter the instance ID to execute Destroy, the disk is immediately released and unrecoverable, and all billing stops simultaneously. Please be sure to sync important fine-tuned weights or business logs to your own external storage before destruction. - Large-scale clusters and enterprise-level compliant procurement:
When your vLLM service moves from a single machine to a high-availability cluster, requiring multiple A100/H100/H200 nodes, RDMA high-speed interconnect, private network data isolation, or monthly/yearly reserved instances, contracts, corporate payment and invoicing (PO procurement), you can directly contact sales to customize an exclusive computing power pool solution.
Conclusion
Completing a high-quality vLLM deployment is essentially about finding the balance point between "VRAM capacity, concurrent throughput, and hardware cost" that best fits the current business stage. There is no need to blindly hoard expensive multi-card servers from the start—through the NexGPU quick start guide, you can rent a consumer-grade or data center-grade GPU with the prebuilt vLLM image at any time, spend a few dollars to run stress tests and understand the real Token throughput boundaries, and then smoothly scale to production.